Happy New Year! I took the month of December off from blogging to focus on my family and Christmas, and we had such a lovely time. We had family visit, celebrated my birthday, and ate so much yummy holiday food. I hope your Christmas was filled with beautiful and lasting memories. Over the holidays, my husband and I worked on fixing up a long, overdue ugly corner of the house. Join me as I work on making our home beautiful and functional.

Setting a Deadline
In getting our home ready for our out of town visitors and the holidays, we were finishing up a construction project right in the middle of our house. When we’re doing big fixer-upper projects to the house, I usually pick a timeline that will finish the project right before some big event at our home. This makes the project a bit more stressful, but I’ve found it we don’t give ourselves a deadline of “my family will be here for Thanksgiving next week and we need to finish this before they arrive” then the projects tend to drag on.
When we moved into our fixer-upper six years ago, my mind was filled with so many ideas and ways to make our house a home. When updating the home yourself while running a family and working a 9 to 5 job, the projects take a while. I’ve learned to accept the slower timeline, but to also stay on track by tackling two big projects a year. When sitting down to plan house projects, we come up with a timeline, draw out a plan with measurements and materials needed, and above all, it can’t just be functional, but has to be beautiful. Making a home beautiful and functional takes a bit of practice, but it’s necessary. Function without beauty will not do.
Fixing the Ugly
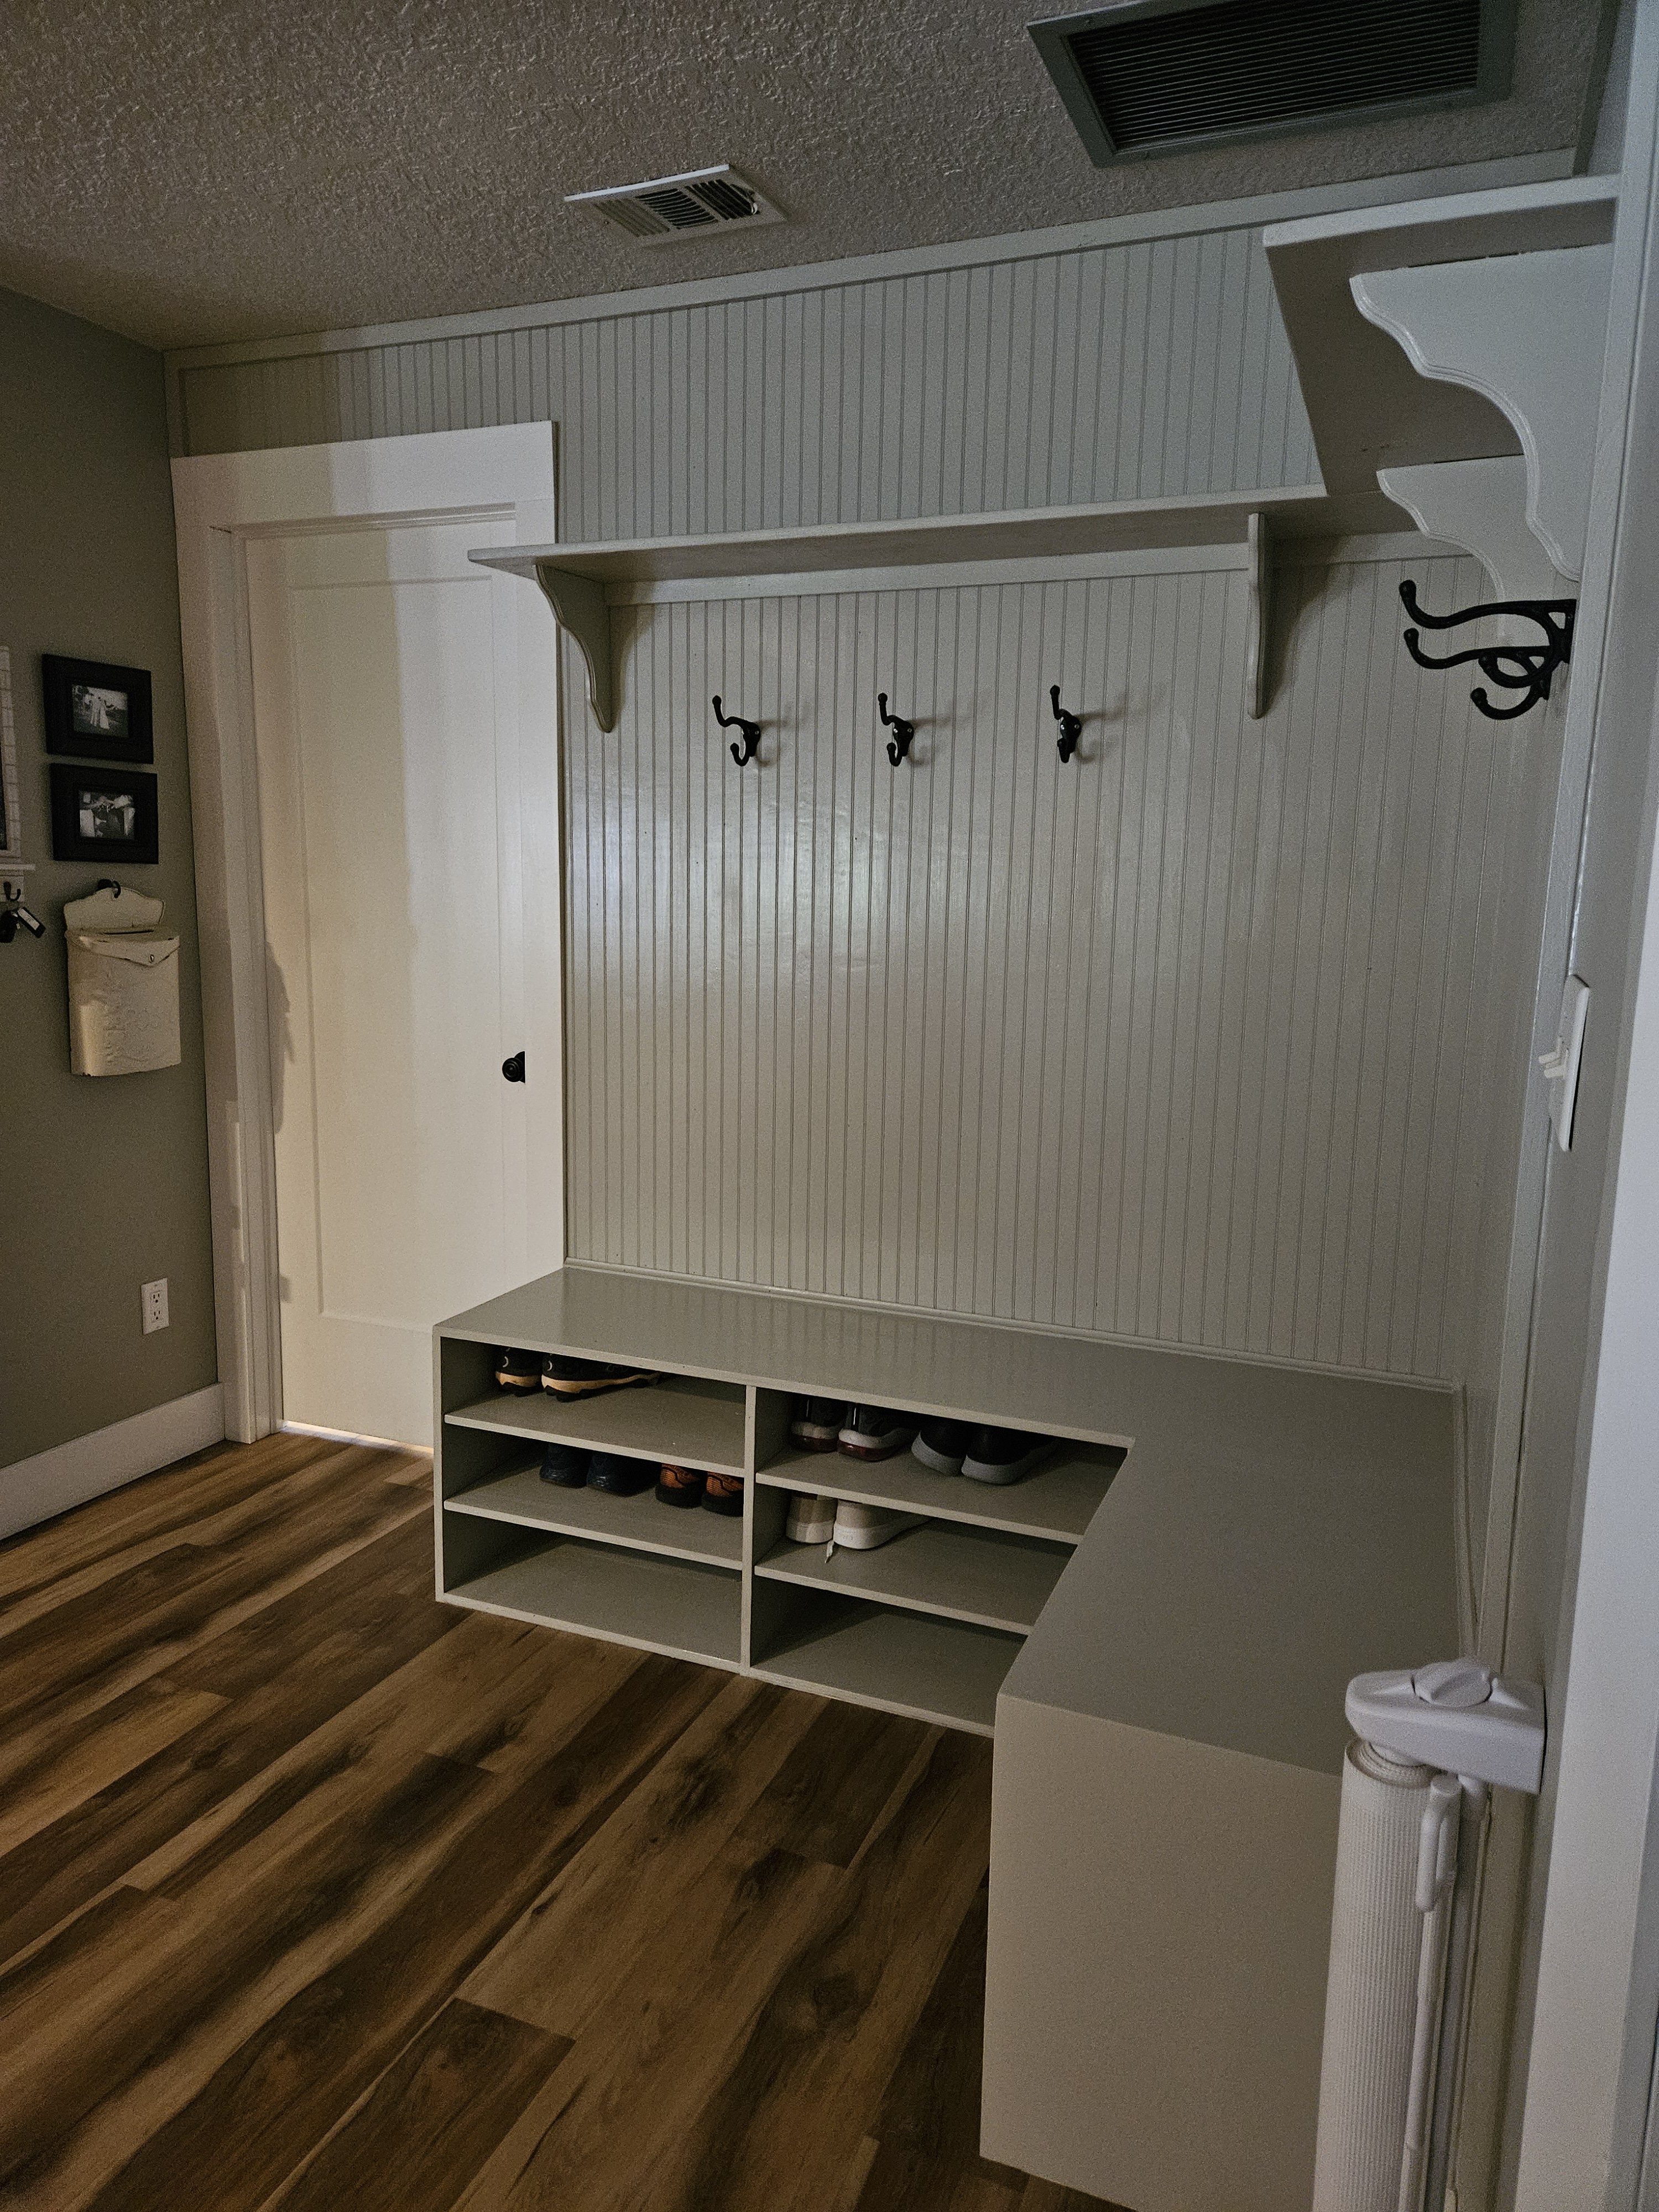
We have a little corner of the house right off of the kitchen, bathroom, and next to the garage door where everyone throws their hats, jackets, and shoes. It’s also where our very lively dog eats and hangs out. Try as I might, this space was always a mess. It wasn’t a mess that I could hide behind closed doors. It was able to be seen from so many points in the house and was a thorn in my side every day.
This ugly corner, right off the kitchen, was the next project to be tackled. It needed to be durable, functional, and above all beautiful. When remodeling a space, it’s such a fun opportunity to be creative and add character, color, and texture to your home design. I was so tired of the boring partible board shoe and hat rack that didn’t fit the space. I’m so happy with what we created. We used real wood, made it fit the space from floor to ceiling, color drenched the moldings, walls, and shelves, and made it functional for our dog who hangs out in the space, too.
My husband measured the space, and we came up with a plan using as many materials as we already had to keep costs lower. We had left over beadboard from a previous bathroom project. Here’s the post about that bathroom renovation. That bathroom is right off of the new boot room space we were trying to create, so the bead board lent itself well to the walls in the new boot room.
Building a Space for Less
When we’re at the hardware store and we see good pieces of wood on clearance, we pick them up in hopes of using them for a later project. So we had some beautiful pieces of wood that wood work for the shelves. Now all we needed was wood for the bench, shelf brackets, hooks for the hats and jackets, and paint.
We started by constructing the corner bench. We used 3/4″ sanded and finished plywood for the sides, supports, and seat of the bench. After it was built and attached to the wall, we added the beadboard to the walls under and above the bench space. We took the beadboard to the ceiling to help the space look bigger and more complete.

Next came the shelves under the bench for the shoes and boots as well as the long corner top shelf for baskets and storage of head lamps to walk the dog or other bits and bobs. We picked out a wooden traditional style bracket for the shelves.

Shopping Vintage to add Character
I love to shop at vintage and antique stores. A few months back, I had picked up two large black iron hooks that I thought would come in handy one day. They worked perfectly for this project. I searched eBay for another matching three hooks, and they arrived within the week and were about $5 a hook.

Making the Space Pet Friendly
We also added a retractable gate for our dog. Previously, we had a large cumbersome gate in that space that took up way too much room and was always getting in the way. The retractable dog gate attached to the wall has made my life so much easier. I’m not tripping over a gate when I walk through that space anymore. Here is a link to the gate we chose and have been so happy with. We also made space for the dog food bin under the bench. It’s a perfect little spot to tuck away the dog food.

The color is Tanglewood by Behr. I used a gloss finish to make for easy cleaning. The walls in our home are the same color, but with a satin sheen. The beadboard board soaked up a lot of paint. After about three coats of paint, the new and improved boot room is complete, done just in time for our holiday party.

Sometimes, it takes a little longer and a little more thought to make something functional and beautiful. Sometimes, you find yourself scouring ebay for the perfect unique item, but the extra time and effort are well worth it. I’m so happy with how this space turned out.
Thanks for stopping by! I wish you all a blessed and beautiful new year! I just celebrated my 4 year blogging anniversary. Thank you to everyone who has stopped by and supported my little corner of the internet. For more homemade family inspiration and recipes follow along @homesteadonlakeside


Leave a Reply